

(With Video Timeline Companion)**
Video Reference: “VAV14‑IP Deep Dive Webinar”
Link: VAV14‑IP First‑Time Setup & Commissioning Webinar
This guide walks you through the exact steps demonstrated in the webinar, with timestamps, screenshots descriptions, and practical examples that help you follow along side‑by‑side.
This knowledge base is compiled from the iSMA CONTROLLI video series.
For the latest videos and updates, visit the channel regularly.
NOTE:
If you want to watch the video while following along with the text notes, then right click and open the video in a new split screen window and the video should appear on the right of the notes so that you can follow along.
Overview
This Knowledge Base article covers:
-
Selecting a VAV application
-
Understanding supported heater/IO configurations
-
Using DIP switches for the first‑time setup
-
Configuring IP addresses across multiple controllers
-
Deploying parameters using ISMA Configurator
-
Using Multi‑Device Manager for bulk operations
-
Where to find documentation and wiring diagrams
Every section corresponds directly to a moment in the webinar, allowing you to jump to the right place immediately.
Q&A Commonly Asked Questions
HERE IS THE OFFICIAL Q&A Document: Q&A_VAV14-IP Programming Webinar.pdf
**📘 0:00 – 2:30
Introduction to the VAV14‑IP & Application Options**
Key points from the video:
-
The VAV14‑IP supports 216 pre‑defined VAV box configurations (0:52).
-
Examples shown (0:58):
-
Cooling only
-
Cooling + electric reheater
-
Series fan‑powered cooling + water reheater
-
-
Beyond predefined setups, users can configure additional types via:
-
DIP switches
-
Free ISMA Configurator tool (Windows)
-
Niagara module (free) (2:00)
-
Customer Tip:
If you're unsure which VAV type matches your installation, start with the predefined list in the Knowledge Base, then adjust parameters in software if needed.
**📘 2:30 – 4:30
Heater Control Types (Example Used in Webinar)**
The presenters select:
VAV Cooling + 2‑Stage Electric Heater
Supported heater output types (3:00):
|
Type |
Outputs |
Notes |
|---|---|---|
|
Time-proportional (TP) |
TRIAC |
Duty‑cycle based |
|
PWM |
TRIAC |
Pulse‑width modulation |
|
1‑ or 2‑Stage Digital |
TRIAC |
Example used in webinar |
|
Floating (Water Reheat) |
Analog |
For water valves |
|
0–10 V Analog Output |
AO |
No configuration required |
Mandatory sensor:
-
Discharge Air Temperature (DAT) → UI1 (3:50 — 4:02)
**📘 4:30 – 6:30
Where to Find the Manuals & Wiring Diagrams**
The webinar demonstrates accessing the online manual:
ICDocs:
👉 https://icdocs.ismacontrolls.com
Steps shown (5:00):
-
Open the site
-
Use the search bar
-
Type “VAV App”
-
Open “VAV14‑IP Software Manual – Application Section”
-
Access:
-
Application logic diagrams
-
IO lists
-
Wiring diagrams
-
Mandatory vs optional sensors
-
Example shown at 9:00:
The wiring diagram for VAV + 2‑Stage Electric Heater, including:
-
Mandatory DAT on UI1
-
Optional CO₂ sensor
-
Optional room temp and setpoint inputs
**📘 6:30 – 12:00
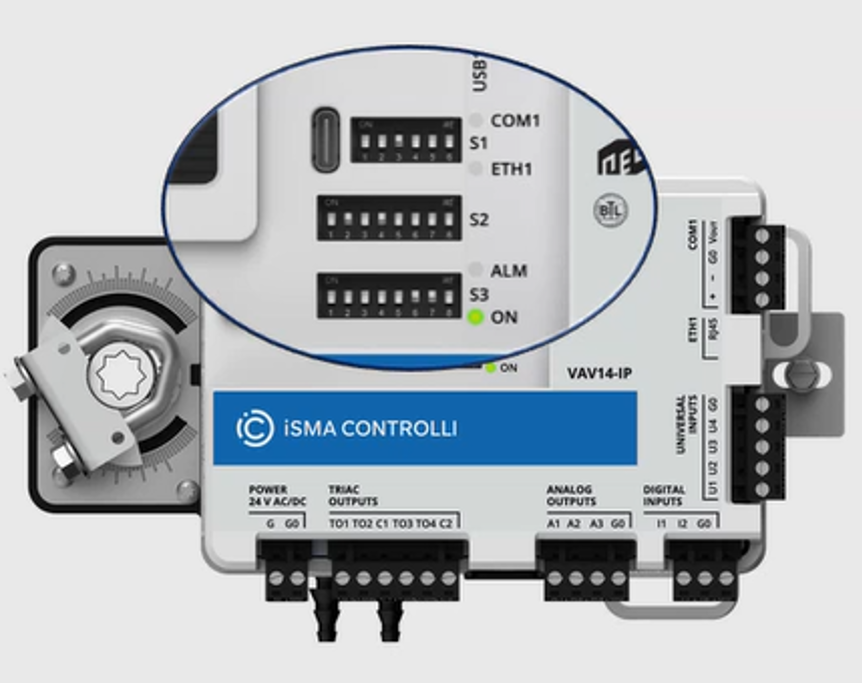
Configuring the VAV Application Using DIP Switches**
The presenters configure the controller using ONLY DIP switches.
Critical DIP Switches (S3):
|
DIP |
Function |
Webinar Notes |
|---|---|---|
|
S3‑1 |
Priority Source |
MUST be ON to allow DIP‑only configuration (12:00) |
|
S3‑2 |
Units (Metric/Imperial) |
Optional |
|
S3‑3 |
Heater Type |
Enable electric reheat |
|
S3‑4 |
Second Stage |
Enable 2‑stage control |
Example from webinar:
-
They activate S3‑3 and S3‑4 to select 2‑stage electric heat.
Tip:
If DIP priority is active, software cannot override DIP‑defined parameters (24:00).
**📘 12:00 – 20:30
IP Addressing Multiple VAV Controllers (IP Manager Tool)**
The presenters use ISMA Tool → IP Manager to scan and program all controllers, even if:
-
All devices share the same factory default IP
-
Devices are not reachable by normal network methods
Steps shown (15:00):
-
Open IP Manager
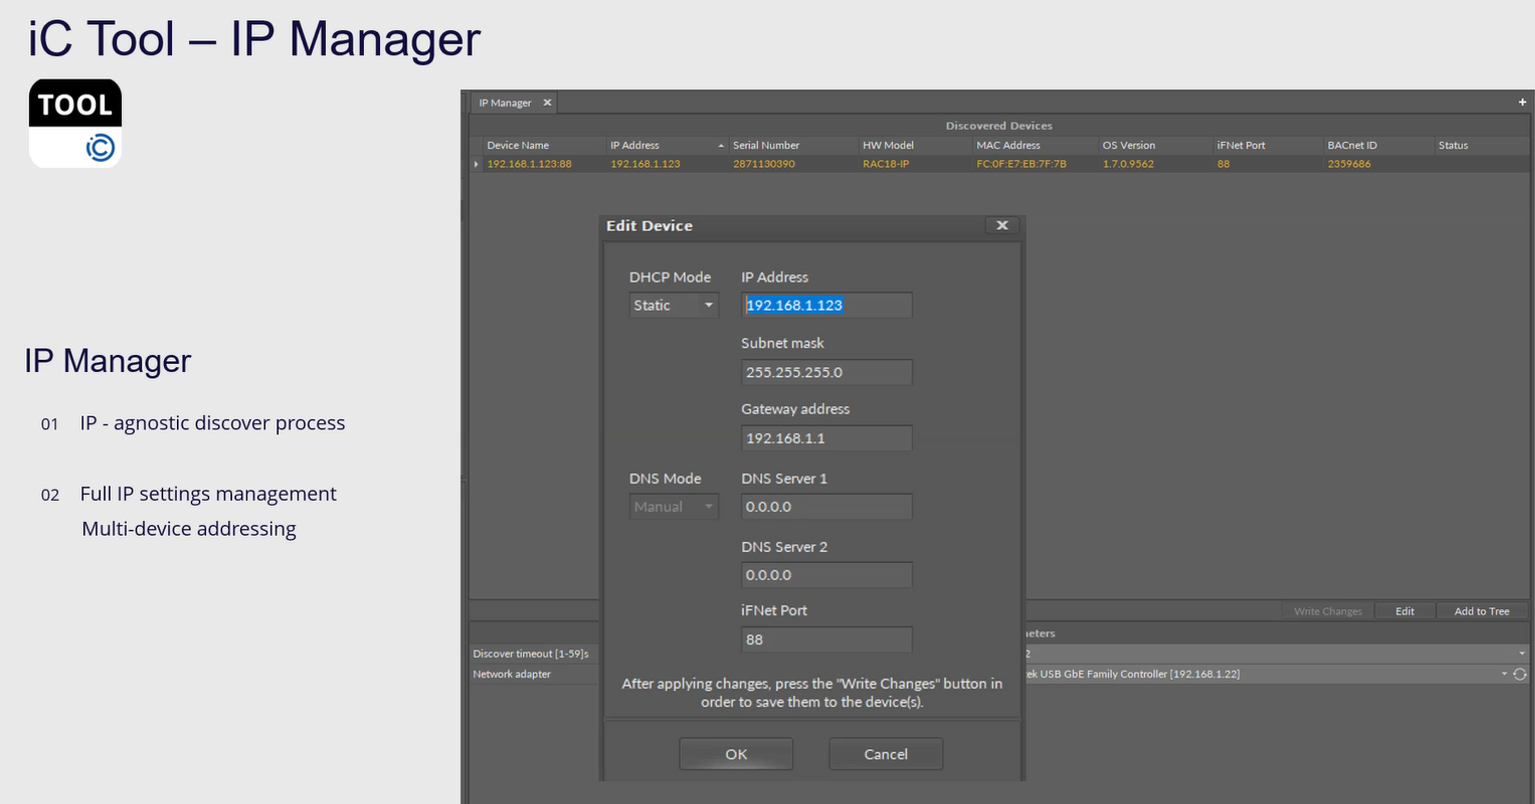
-
Click Discover
-
IP Manager finds all VAV controllers by:
-
MAC address
-
Serial Number
-
BACnet Device ID
-
-
Select all devices
-
Click Edit
Set Static IP Range (17:30 example):
Base IP: 192.168.1.110
Subnet: 255.255.255.0
Gateway: 192.168.1.1
Increment: 1
Outcome:
-
Device 1 → 192.168.1.110
-
Device 2 → 192.168.1.111
-
Device 3 → 192.168.1.112
-
etc.
Auto‑Reboot:
All controllers reboot after IP change — confirmed by the audible actuator resets at (20:00).
**📘 20:30 – 27:00
Configuring & Deploying VAV Parameters (VAV Configurator View)**
Inside ISMA Configurator → VAV Configurator, the presenters:
-
Start BACnet/IP transmission (22:00)
-
Discover all VAVs
-
Read parameters from a selected controller
-
View live configuration values
-
Change allowable parameters (e.g., min/max flow, reheater enable)
-
Push changes to all devices at once
DIP Switch Priority Reminder (24:00):
If S3‑1 is ON → DIP switch parameters cannot be overridden from software.
When they attempt to modify reheater type, a warning popup appears.
**📘 27:00 – 33:00
Using Multi‑Device Manager (Bulk Backups, Passwords, Time, Restarts)**
The presenters show how to:
Bulk Operations Include:
-
Set controller time (28:50)
-
Change passwords
-
Restart multiple devices
-
Download backups
-
Upload backups
-
OS upgrades
-
Push configuration data (32:00)
Authentication Required:
First action must be a successful login to one device → credentials are cached (29:30).
Example Anti‑Pattern:
Attempting to set time on 3 controllers fails on 2 of them because they hadn’t been logged into yet.
**📘 33:00 – End
Upcoming Features – Multi‑Sensor Averaging & Real-Time Programming**
The presenters preview:
-
Linking multiple CP panels (up to 5) via Smart‑Plug
-
Averaging multi‑room temp sensors in real time
-
Nano‑Edge Engine programming inside the controller
-
Adding secondary applications running in parallel
-
USB/Network programmability
This will be covered in a future webinar (33:50).
📌 Summary Table: Video → Knowledge Base Mapping
|
What You Learn |
Video Timestamp |
KB Section |
|---|---|---|
|
VAV14‑IP Capabilities |
0:00 – 2:30 |
Intro |
|
Heater Control Types |
2:30 – 4:30 |
Heater Logic |
|
Finding Manuals (ICDocs) |
4:30 – 6:30 |
Documentation |
|
DIP Switch Setup |
6:30 – 12:00 |
DIP Config |
|
IP Manager Usage |
12:00 – 20:30 |
IP Addressing |
|
VAV Configurator |
20:30 – 27:00 |
Parameter Deployment |
|
Multi‑Device Manager |
27:00 – 33:00 |
Bulk Actions |
|
Advanced Programming |
33:00 – End |
Next Steps |
Other Resources & Customer Survey:
💬 Don't miss out! Follow the Forest Rock News channel on WhatsApp Click Here!
💬 We’d also love your feedback! Please take a moment to complete our quick Customer Survey
It only takes a minute and helps us serve you better!

IoT Devices for BMS, Automation & Smart Connectivity | Forest Rock