

BACnet/SC is redefining secure building connectivity.
Built into ASHRAE 135-2024, BACnet Secure Connect replaces legacy broadcast networking with encrypted, TLS 1.3 WebSocket communications, delivering authenticated, firewall-friendly, and highly scalable building automation networks without the constraints of BBMDs or fixed IP infrastructure.
This guide provides a practical, field-proven approach to configuring a BACnet/SC Hub in Niagara 4.11+, aligned with Forest Rock deployment standards. Whether deploying new systems or modernising existing BACnet/IP networks, it enables engineers to implement secure, interoperable, and future-ready architectures with confidence.
Why BACnet/SC?
BACnet Secure Connect (SC) modernises building network communications by introducing:
-
TLS-secured messaging – protecting data with industry-standard encryption
-
WebSocket transport – enabling reliable, firewall-friendly connectivity
-
Hub-and-node architecture – simplifying topology, scalability, and management
Whether you’re commissioning a new installation or upgrading an existing system, this guide helps you deploy BACnet/SC with confidence and consistency.
NOTE: This BACnet/SC function is available from Niagara 4.11, therefore, it is required to make sure that the 4.11 or higher version has been installed.
Prerequisites
Before starting, ensure:
-
Niagara version 4.11 or higher
-
BACnet driver installed and licensed (including BACnet Secure Connect)
-
A digitally signed server certificate installed on the platform
-
The certificate is assigned in WebService
-
Basic BACnet network configured
⚠️ Critical: BACnet/SC will NOT function without correctly configured certificates.
Hub configuration in a station
IMPORTANT: Before you begin, ensure the station has an active, digitally signed server certificate. The full process is covered in Niagara – Certificates – Creating and Signing Certificates of Devices.
Once the certificate is in place, confirm it is selected within the WebService component as the active certificate. This is essential for secure BACnet/SC operation.
NOTE: Be sure to click “Save” at each step indicated throughout this process.
The configuration sequence is order-dependent, skipping a save or applying steps out of sequence can prevent the integration from working correctly.
-
In the initial steps, complete a standard BACnet setup as outlined in Niagara – BACnet – Basic Configuration Steps.
Once this is in place, navigate to:
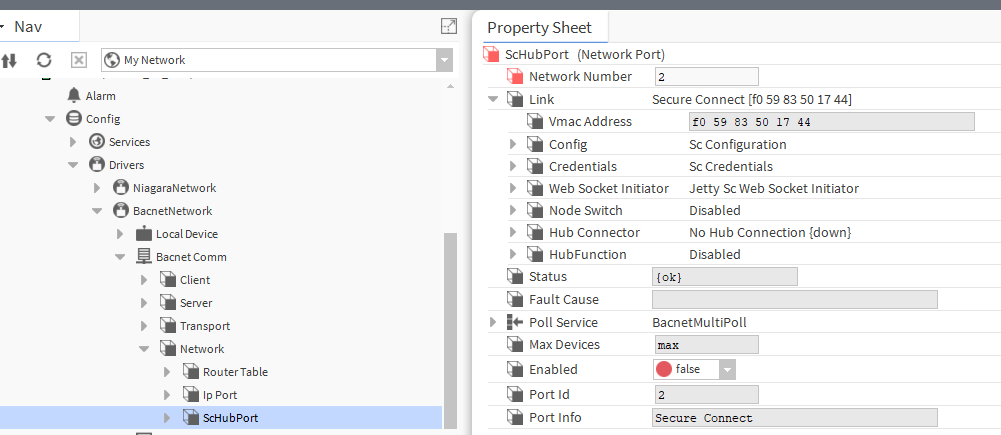
Config → Drivers → BacnetNetwork → BacnetComm → Network
From the BACnet palette, add an ScHubPort to the network, then configure its NetworkNumber slot accordingly.
-
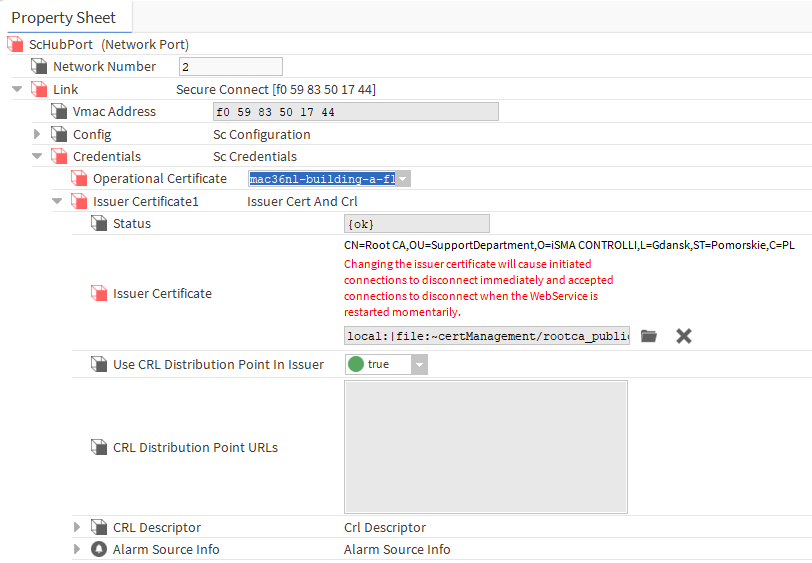
Next, expand Link → Credentials and configure the certificate parameters:
-
In the Operational Certificate field, select the digitally signed server certificate from the list.
-
In the Issuer Certificate field, specify the path to the PEM file containing only the public key of the custom CA certificate that signed the server certificate.
After completing both entries, click Save to ensure the configuration is properly applied.
-
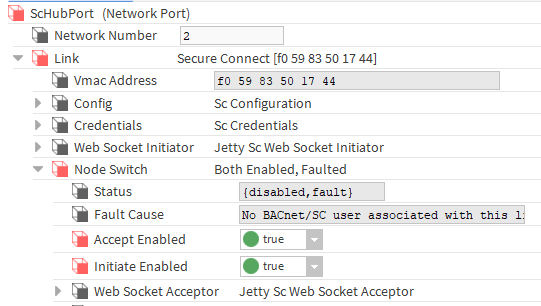
In the next step, configure the Node Switch to define how the node handles direct inbound and outbound connections:
-
Set both Accept Enabled and Initiate Enabled slots to true
-
Click Save to apply the changes
At this stage, an error message may appear, this is expected. It can be safely ignored for now, as it will be resolved in a later step of the configuration process.
-
Expand the Hub Function folder, set Enabled to true, and click Save to apply the change.
Next, right-click on Hub Function, navigate to Actions, and invoke Add Sc User. This will create a new user required for BACnet/SC communication.
After this, return to the ScHubPort component, set its Enabled slot to true, and click Save again.
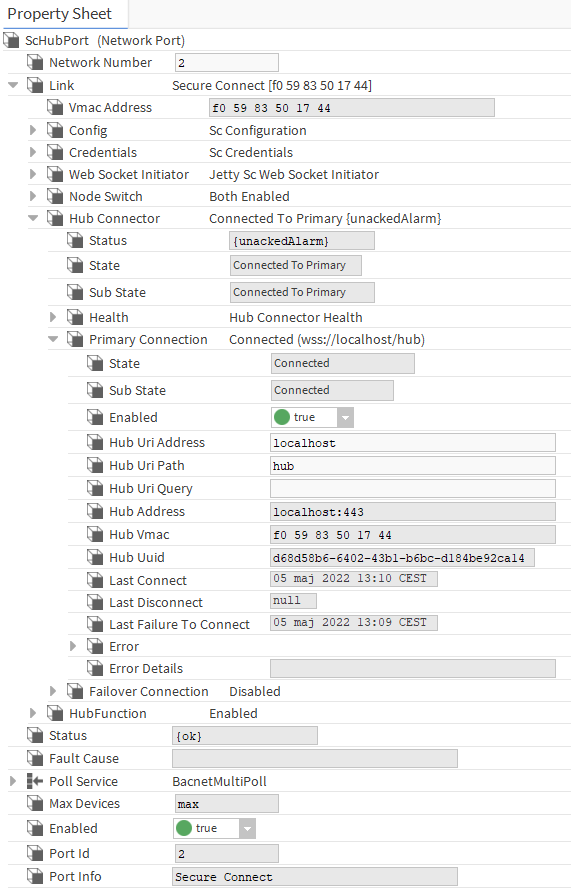
To verify communication between the host and the hub running locally, navigate to:
ScHubPort → Link → HubConnector → PrimaryConnection
Check the connection status within this folder to confirm that the link has been successfully established.
-
At this stage, you may encounter a TLS certificate error. This typically indicates that the WebService is still using a default or self-signed certificate instead of the required digitally signed server certificate.
If this occurs:
-
Go to the WebService component and update it to use the correct digitally signed server certificate.
-
Return to the ScHubPort component.
-
Set the Enabled slot to false and click Save.
-
Then set Enabled back to true and click Save again.
This restart of the ScHubPort ensures the updated certificate is applied correctly and should clear the TLS-related error.
-
NOTE: The (MAC36NL Only): The MAC36NL platform has a known limitation with opening communication ports below 1024. When configuring a BACnet/SC hub on a MAC36NL, you must change the HTTPS port in the WebService to a value above 1024 (for example, 8443).
If the default port 443 is used, the BACnet/SC hub will not initialise or operate correctly. This limitation does not apply to the JACE8000, which can operate normally using the default HTTPS port.
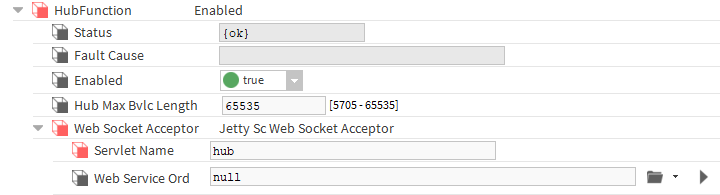
NOTE: The hub is created with the default name “hub”. If you need to change this, navigate to: ScHubPort → Link → HubFunction → WebSocketAcceptor and update the Servlet Name field.
When modifying the hub name, you must also update the Hub Uri Path to match. This setting can be found at: ScHubPort → Link → HubConnector → PrimaryConnection
Ensure the same Hub Uri Path is configured consistently on both the hub and all connected client devices, otherwise communication will fail.
NOTE: For improved resilience of the BACnet/SC network, it is recommended to configure a secondary (backup) hub on a separate device and define it within the Failover Connection settings.
If the standby hub uses a certificate signed by a different Certificate Authority (CA), ensure the public key of that CA is added to the Issuer Certificate2 component.
Additionally, the backup hub must use a unique name, its Servlet Name must be different from that of the primary hub to avoid conflicts.
NOTE: Make sure to set up roles for BACnet and BACnetSC_ScHubPort users. Roles must have appropriate access to components that are to be overridden in the future from another device connecting via the BACnet/SC protocol.
Configuring a Hub to Support Devices with Certificates from Multiple CA's
Supporting devices that use certificates signed by different Certificate Authorities (CAs) would normally be handled by configuring multiple Issuer Certificates and assigning corresponding server certificates within the WebService. However, due to a known driver limitation, this approach is not fully supported and requires a workaround.
Workaround Overview:
The recommended method is to create two or more ScHubPort instances within a single station and route traffic between them.
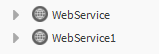
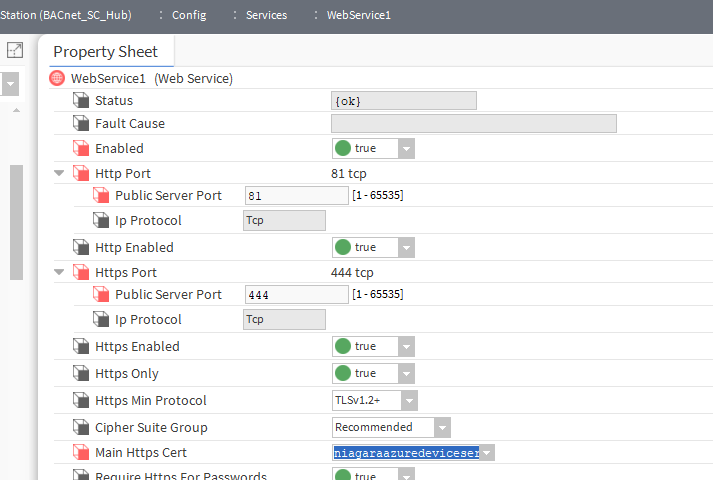
Next, open the WebService1 component and apply the following configuration:
-
Assign the second server certificate to this service
-
Modify the communication ports so they do not conflict with those used by the primary WebService
-
Set the component to Enabled = true
Once configured, click Save to apply the changes and bring the service online.
Next, from the BACnet palette, add a second ScHubPort at:
Config → Drivers → BacnetNetwork → BacnetComm → Network
Configure this new ScHubPort2 in the same way as described previously, but ensure it uses the second server certificate and the public key of the second CA certificate.
Then apply the following additional settings:
-
In the NetworkNumber slot of ScHubPort2, assign a unique network number to avoid conflicts
-
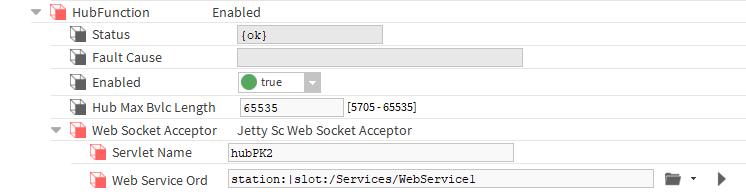
Navigate to:
ScHubPort2 → Link → HubFunction → WebSocketAcceptor-
Set a unique name in the ServletName slot (this must differ from the primary hub)
-
In the WebServiceOrd slot, reference the second WebService component created earlier
-
Finally, click Save to apply all changes.
-
Next, navigate to:
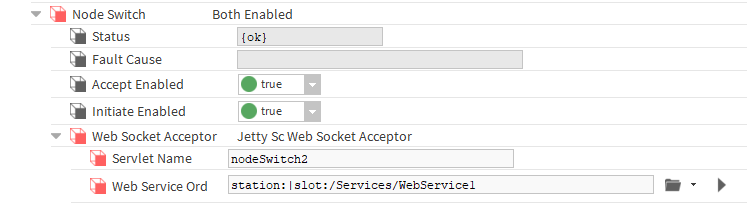
ScHubPort2 → Link → NodeSwitch → WebSocketAcceptor
Apply the following configuration:
-
Set the ServletName slot to a unique value (different from both the primary node switch and hub names)
-
In the WebServiceOrd slot, reference the second WebService component
Once completed, click Save to apply the changes and ensure the configuration is active.
-
-
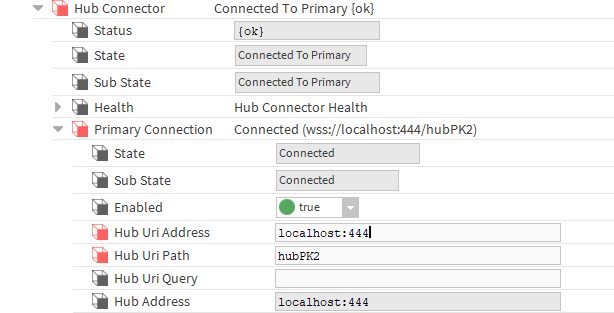
When configuring client devices to connect to the hub, navigate to HubConnector → PrimaryConnection and ensure the connection details are correctly set:
-
In the HubUriAddress slot, enter the full hub address including the port number defined in the WebService1 component (for example:
wss://<host>:8443) -
In the HubUriPath slot, specify the unique hub name assigned to the secondary hub
These settings must align exactly with the secondary hub configuration. Any mismatch in the address, port, or path will prevent a successful connection.
-
-
Next, ensure the original ScHubPort is correctly aligned with the primary certificate and WebService:
-
Navigate to:
ScHubPort → Link → HubFunction → WebSocketAcceptor
and set the WebServiceOrd slot to reference the primary WebService (using the first server certificate signed by the first CA) -
Then navigate to:
ScHubPort → Link → NodeSwitch → WebSocketAcceptor
and again set the WebServiceOrd slot to the same primary WebService component
Click Save after applying these changes.
-
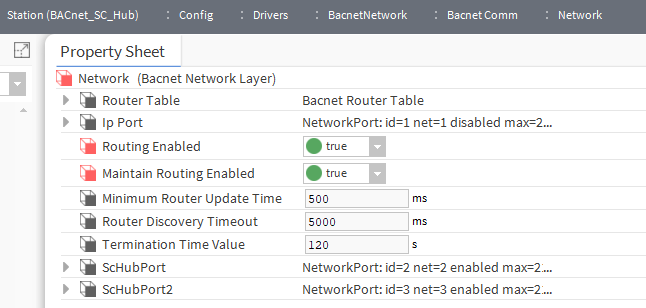
Once these steps are complete, the station will be capable of supporting devices using certificates signed by two different CA authorities.
It is important to note, however, that these devices will effectively operate on separate BACnet networks, with communication between them enabled through BACnet routing configured at the station level.
Solving problems
In case of configuration problems, the ScHubPort component has many subcomponents, which are slots describing the details of errors. At least some of them are listed below, as well as possible causes and their solutions.
|
Message |
Possible cause and solution |
|---|---|
|
|
|
|
No BACnet/SC user associated with this link layerWeb socket failed: UpgradeException (HTTP status code: 401 Unauthorized): 401 Unauthorized |
A BACnetS/C user has not yet been added via the action invoked on ScHubPort->Link->HubFunction. 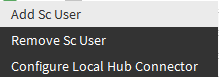
|
|
Web socket failed: UpgradeException (HTTP status code: 401 Unauthorized): 401 Unauthorized |
In ScHubPort->Link->NodeSwitch the AcceptEnabled and InitiateEnabled were not set to true. |
|
No trust anchors specified for BACnet SC |
No CA public certificate has been selected in the ScHubPort->Link->Credentials->IssuerCertificate, to sign clients certificates. |
|
javax.baja.sys.LocalizableException: No link layer operational certificate selected |
No server certificate for the BACnet S/C hub has been specified in the ScHubPort->Link->Credentials->OperationalCertificate. |
|
Web socket failed: ConnectException: Connection refused |
One of the following:
|
|
Web socket failed: UpgradeException (HTTP status code: 200 OK): Failed to upgrade to websocket: Unexpected HTTP Response Status Code: 200 OK |
One of the following:
|
|
Web socket failed: TlsFatalAlert: certificate_unknown(46) |
The server certificate signed by the CA certificate indicated in ScHubPort was not selected in the WebService. |
|
|
|
Data Sheet