

Commissioning Issues and Troubleshooting
During commissioning, configuration errors can occur that may prevent normal access or operation. A common example is entering an incorrect IP address, which can result in loss of connectivity to the controller.
This section provides guidance to help diagnose and resolve such issues, as well as offering general support for controller operation.
Shutting down the controller
This procedure safely prepares the controller before you remove power.
The controller is powered on. Any running devices (HVAC, boiler, meter, etc) have been set in a standby mode.
-
Press and hold the SHUT DOWN button until the SHUT DOWN LED flashes (about 5 seconds).
Note: Releasing the button after the flashing LED starts confirms that the button press is intentional.
After about 10 seconds, the BEAT LED is no longer lit, indicating that the shut down preparation process is complete.
-
Remove power from the controller.
Shut down is complete.
Resolving a passphrase mismatch
Controller Replacement and Passphrase Mismatch
In the event of a controller failure, it is possible to maintain continuity by transferring the SD or microSD card from the failed unit into a replacement controller. However, the removable storage retains the system passphrase from the original device, which will not match the factory passphrase of the replacement unit.
This mismatch prevents a successful boot sequence. The condition is indicated by the STAT LED flashing at a 50% duty cycle with a 1-second period, confirming a passphrase validation failure.
Typical Scenario
-
A controller has failed and been physically replaced.
-
The original SD/microSD card is inserted into the new unit.
-
The replacement controller does not boot due to a system passphrase mismatch.
-
A commissioning engineer is connected via Workbench on a PC within the same network.
-
The original controller’s passphrase is known.
When connected to the controller’s debug (serial) port, the issue is clearly identified by a warning banner displayed in the system shell.
Figure 1. System passphrase mismatch warning in the serial shell
Note: Example shown from a JACE-8000 shell session. Messaging on a JACE-9000 is functionally equivalent.
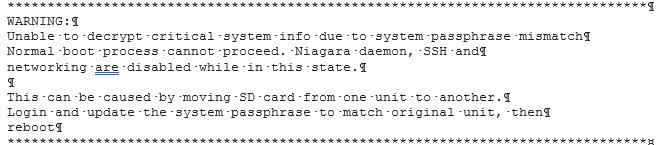
This warning prompts you to log in using platform credentials and update the system passphrase via the serial connection.
-
Make a serial connection to the unit’s DEBUG port.
-
Log in to the controller via the serial connection.
The System Decrypt Failure Menu opens with the following options:
1 Update system passphrase
2 Remove all encrypted data
3 Reboot
4 Logout
-
Choose Update system passphrase.
-
Enter the system passphrase for the original controller.
Pre-configuring (via a serial connection) the replacement controller with a system passphrase that matches the one stored on the removable memory card (which you swapped out from the original unit) facilitates commissioning the replacement unit. In this situation, the commissioning process does not prompt for a passphrase since it detects a passphrase match.
Reviewing a controller’s TCP/IP changes
The Commissioning Wizard and platform’s TCP/IP Configuration object configure controller TCP/IP settings. Workbench records TCP/IP before and after the change values in an ipchanges.bog file. If necessary, you can review these changes.
You are working in Workbench with a connection to the remote controller.
-
Expand Platform and double-click TCP/IP Configuration.
TCP/IP Configuration view opens.
-
Click the Audit button.
The ipchanges.bog folder’s Property Sheet opens.
Child folders are date-named using the following convention:
<yyyymmddhhmmss>, where the variable name contains year, month, day, hours, minutes, seconds; for example, d20250113153640 for 2025 Jan 13 3:36pm and 40 seconds.
-
priorValue reports the TCP/IP settings that existed before the change.
-
newValue reports the TCP/IP settings that existed after the change.
-
-
Expand the folder and expand either priorValue or newValue.
The included decoded modTime value is easier to read. For example, 13-Jan-2024 03:36 PM EST instead of d20150113153640).
Reviewing a PC’s TCP/IP changes
You configure a PC’s TCP/IP settings using Windows. Workbench records TCP/IP before and after the change values in an ipchanges.bog file. If necessary, you can review these changes.
You are working in Workbench with a connection to your PC.
-
In the Nav tree, expand My Host > My File System > User Home > ipchanges.bog.
Child folders are date-named using the following convention:
<yyyymmddhhmmss>, where the variable name contains year, month, day, hours, minutes, seconds; for example, d20250113153640 for 2025 Jan 13 3:36pm and 40 seconds.
-
To expand a folder, right-click and select Views > Property Sheet.
The Property Sheet for the folder opens.
The included decoded modTime value is easier to read. For example, 13-Jan-2024 03:36 PM EST instead of d20150113153640).
Under each folder are two properties:
-
priorValue reports the TCP/IP settings that existed before the change.
-
newValue reports the TCP/IP settings that existed after the change.
-
-
Expand a priorValue or newValue to see the reported settings.
Restoring factory defaults (JACE-9000)
The process of recovering factory defaults deletes all platform and station data, and returns the controller to the state it was in when it shipped from the factory. If you cannot commission the controller because you made an error when entering the default platform daemon credentials or passphrase, you can restore factory defaults and start again. Also, when decommissioning a controller, a best practice is to recover the factory defaults, which removes the platform and station data from the controller. This procedure uses a terminal emulator program to access the controller’s system shell menu.
-
You have backed up all data from the controller.
-
The controller's DEBUG port is connected to your PC using a USB-to-USB-C cable.
-
PuTTY or an equivalent terminal emulator software is running on your PC and connected at 115200 baud, to the virtual COM port provided by the USB cable connection. This will require that you have the ftdichip.com VCP driver installed.
CAUTION: Recovering factory defaults removes all platform and station data from the device. Make sure this is what you intend before you follow this procedure.
To reset a JACE-9000 to factory default state:
-
Without power, and with the outer panel cover open, press and hold the SHUT DOWN button on JACE-9000 the control panel.

-
Continue to press the SHUT DOWN button, while connecting the power.
When the LED next to the button starts blinking green, lift your finger off the button. Then wait about 5 minutes until you see the "login:" prompt in the serial shell.
When the BEAT LED blinks at normal rate the process is complete.
To set up the restored controller platform you will need to log in to the serial shell using factory default credentials.
-
Resetting platform credentials (JACE-9000)
Occasionally a situation will arise where you have a functional JACE-9000 controller but no valid credentials or system passphrase. This could be due to a change in building ownership or control contractors. The Platform Account Recovery feature provides you with a secure method of regaining access to the controller without losing station data and configuration.
You should have access to the following items and information before starting this task.
-
A USB-C cable to connect the controller to your PC.
-
A terminal emulator (system shell) program, such as PuTTY, installed on your PC.
-
During the procedure, you will be prompted to provide the Host id and “proof of ownership” for this controller.
Resetting platform credentials is accomplished using a multi-step process that involves using serial shell software plus contacting your Support channel, and interacting with Tridium by phone or email in order to initiate a secure method of validating that you (the serial shell user) are authorized to reset the platform credentials and system passphrase.
Note: The controller must be rebooted to initiate this procedure. This process could take several hours to complete, depending on your access to cell phone or internet service.
-
If the controller is running, press and hold the SHUTDOWN button until the BEAT light stops blinking (about 5 seconds).
-
Remove power from the controller.
-
Connect a USB-C cable from your PC to the controller DEBUG port.
-
Open a terminal emulator (system shell) program and connect to the controller. See the “Connecting to the controller system shell” topic for details on connecting.
-
Important:
In this step, you need to monitor the terminal emulator window and respond to prompts using the PC keyboard.
-
You have just a few seconds to press the Escape key. If you press Esc too late, you will not get the Boot Options menu and will need to repeat the reboot process.
-
If you press Esc after the Boot Options menu appears, the system will ignore further input until an alphabetic character is entered (for example, the letter “a”). If this happens and the menu does not respond to input, do the following:
-
Enter the letter “a” (you may need to press the keyboard twice) or any other alphabetic (non-numeric) character to exit the Escape mode.
-
Delete the alphabetic character that you just entered and continue the process as described below.
-
Power up the controller and during the boot sequence, press Esc when you see the following message:
Press ESC to enter boot options....The Boot Options menu displays, as shown below.
Boot Options ------------ 1 Reset platform credentials 2.Continue with boot Enter Choice :_ -
-
Type 1 in the Enter Choice: field to select “Reset platform credentials”, and enter Y to confirm and continue.
The Platform Access Recovery screen displays, showing the controller’s Host id and a randomly generated Token with additional instructions, as shown.
********************************** **** Platform Access Recovery **** ********************************** Host id : ATLAS-SD-F84C-2E6D-D888-BB87 Token : AE85-2F72-DA11-260C Key version: 1 Contact technical support and provide them with the hostId and token. Token is valid for 24 hours. Recovery process will exit if key is not provided within 24 hours. Would you prefer to enter key in: 1 Single line (best when key is copied from email) 2 Multiple lines (best when receiving key over voice) Enter Choice : -
Contact your appropriate Support channel and request credential/system passphrase reset for the Host id shown on-your screen.
-
When prompted, provide the support representative with the required “proof of ownership” for the controller.
Once proof of ownership is established the support representative will notify Tridium.
-
When prompted In the Platform Access Recovery screen, enter the customer name. For example, Joe NewBuildingOwner.
-
Contact Tridium (either via phone or email) and provide the generated token, the Host id, and the customer name entered in the previous step.
The Tridium representative validates your customer identity via Niagara Licensing, and generates a “Signature” for the token/Host id/customer name that includes a Reset Authorization Key. This Signature is sent to you either by phone or email.
CAUTION: The Reset Authorization Key is valid only for 24 hours from the time it is generated. If you do not enter the key in the Platform Access Recovery screen within the 24 hour period, you must start over with step 1 of this procedure to obtain another Key.
-
Once you have received the Signature, in the Platform Access Recovery screen indicate your preference for entering the Reset Authorization Key in the serial shell window; enter one of the following:
-
Enter1 for Single Line (best when the Key is copied from email), and at the “Enter Key” prompt paste the Reset Authorization Key. After checking the key enter v to verify it (or if necessary, enter 1 to edit the key and then v to verify it.)
-
Enter2 for Multiple Line (best when receiving the Key over voice), and at the “Enter line x” prompts enter the string of characters as instructed. After checking your entries enter v to verify the key.
The controller uses the previously installed
tridiumcertificate to verify that this Signature was generated by private key for the given token/Host id/customer name values. Afterwards, the system software generates the factory default username/password credentials and default system passphrase.The serial shell window displays the following text and reboots after the specified amount of time:
Verification Passed System user credentials are reset Shutdown in 10 seconds -
-
Make a serial or platform connection to the controller. On detecting default credentials, the system prompts you to change the default credentials and default system passphrase before completing the platform connection.


On completion, you can login and access the station data and configuration as you normally would.
This article will be updated over time to reflect new suggestions & features with the JACE 9000 Hardware
Other Resources & Customer Survey:
💬 Don't miss out! Follow the Forest Rock News channel on WhatsApp Click Here!
💬 We’d also love your feedback! Please take a moment to complete our quick Customer Survey
It only takes a minute and helps us serve you better!

IoT Devices for BMS, Automation & Smart Connectivity | Forest Rock