

A Forest Rock - Project Base Camp - Training Guide
Overview
The Milesight WT101 Thermostatic Radiator Valve (TRV) can send temperature readings into Niagara without any special work. However, if you want Niagara to write a new setpoint back to the TRV, that requires a LoRa downlink message.
Unlike simple LoRa devices that accept fixed commands (e.g., “turn relay on”), the TRV requires a dynamic payload—meaning the payload changes every time because the setpoint changes.
This guide explains the concept in a simple, practical way so you can create your own working solution in Niagara.
1. Why TRV Setpoints Are Different
While for some devices a set of fixed commands are used to drive a static action (close relay/open relay), the TRV self controls its operation and requires a temperature setpoint. Such a setpoint might need adjusting by a user or an automated time schedule, therefore a smarter conversion to build the payload on the fly might be needed, essentially to transform the desired temperature (setpoint) into a dynamic command needed by the TRV.
The WT101 is different because you need to send a temperature value, not a fixed text string. That value must be packaged into a special format before the LoRa gateway (UG65/UG67) will accept it.
To make this work, Niagara needs to build the payload on the fly based on your desired setpoint.
2. What the Gateway Expects
A Milesight UG65/UG67 sending a downlink requires JSON in this structure:
{"confirmed": false, "fport": 85, "data": "<base64 data>"}
The data field must be:
-
A command (hex)
-
Your setpoint (hex)
-
Converted into a byte array
-
Encoded into Base64
For example, to set 25°C:
-
TRV command: ff b1
-
Temperature in hex: 19 (because 25 decimal = 0x19)
-
Footer: 01 00
Full hex string becomes:
ff b1 19 01 00
When Base64‑encoded, this becomes:
/7EZAQA=
Which gives the final JSON:
{"confirmed": false, "fport": 85, "data": "/7EZAQA="}
Because your setpoint will change, Niagara must generate this Base64 string dynamically.
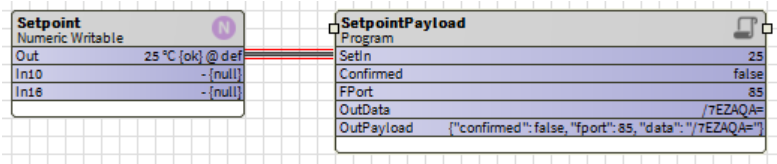
See Property Sheet OutPayload String

3. Making Niagara Generate the Payload Automatically
To avoid manual conversion, you can create a simple Niagara Program Object that:
-
Takes your numeric setpoint (e.g., 18–30°C)
-
Converts it into the correct hex format
-
Converts the hex into bytes
-
Converts the bytes into Base64
-
Outputs the ready‑to‑send JSON payload
With that out of the way, use the code below on the "Edit" tab:
-
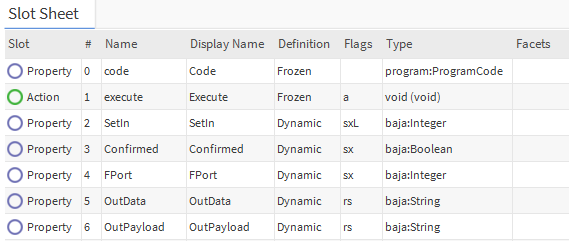
SetIn → your setpoint (integer)
-
Confirmed → true/false
-
FPort → typically 85
-
OutData → Base64 only
-
OutPayload → full JSON string to publish via MQTT
Below is the working code exactly as used in Niagara:
Java
public void onStart() throws Exception
{
  // start up code here
}

public void onExecute() throws Exception
{
  // execute code (set executeOnChange flag on inputs)

  // Your integer value (1 byte)
  int byteValue = getSetIn();

  // Convert the byte to a hex string
  String hexString = Integer.toHexString(byteValue);

  // Pad the hex string to ensure it has two characters
  if (hexString.length() == 1) {
      hexString = "0" + hexString;
  }

  // Concatenate "ffb1" to the beginning and "0100" to the end of the hex string
  String finalHexString = "ffb1" + hexString + "0100";

  // Convert the hex string to bytes
  byte[] byteArray = hexStringToByteArray(finalHexString);

  // Encode the byte array to a base64 string
  String base64String = java.util.Base64.getEncoder().encodeToString(byteArray);

  // Push the value to the output
  setOutData(base64String);

  // Additional inputs
  boolean confirmed = getConfirmed();
  int fPort = getFPort();

  // Construct the JSON string
  String jsonString = "{\"confirmed\": " + confirmed + ", \"fport\": " + fPort + ", \"data\": \"" + base64String + "\"}";

  // Push the value to the output
  setOutPayload(jsonString);
}

public void onStop() throws Exception
{
  // shutdown code here
}

public static byte[] hexStringToByteArray(String hexString) {
        int len = hexString.length();
        byte[] data = new byte[len / 2];
        for (int i = 0; i < len; i += 2) {
            data[i / 2] = (byte) ((Character.digit(hexString.charAt(i), 16) << 4) + Character.digit(hexString.charAt(i + 1), 16));
        }
        return data;
    }
Once compiled, the object automatically builds the correct downlink for you.
4. What to Expect When Writing to the Valve
This is important:
LoRa Class A devices (like the WT101) only receive downlinks after they next transmit an uplink.
Which means:
-
You send the new setpoint
-
The valve doesn’t apply it straight away
-
It first sends one more uplink with the old setpoint
-
THEN it accepts your new downlink
-
Future uplinks show the new setpoint
This delay is normal and is part of LoRa low‑power design.
5. Summary
Here’s the process in plain English:
-
Niagara generates a dynamic Base64 payload from your setpoint.
-
You send that payload via MQTT to the UG65/UG67.
-
The valve updates the setpoint the next time it wakes up.
This guide provides a reliable template that you can drop straight into any Niagara project requiring dynamic LoRa TRV control.