

Last Updated: January 2026
Applies To: Niagara Workbench (Windows PC), versions N4.8–N4.15+
Author: Forest Rock Technical Support
1. Overview
The Niagara Workbench Console is a command-line interface included with every Niagara installation. It provides visibility into Workbench startup, enables direct control of core platform services, and allows quick retrieval of system information often needed for licensing or support diagnostics.
Using the console can save significant time during troubleshooting—especially when Workbench crashes, Niagara Daemon won’t install, or Host IDs need to be confirmed.
2. Launching the Workbench Console
On Windows:
Start Menu → Niagara → Version → Open Console
You will see a blue command window showing your current installation path, e.g.:
Niagara 4.15.1.1 (Vykon Distribution)
The console accepts several built-in commands that interact directly with the Niagara runtime.
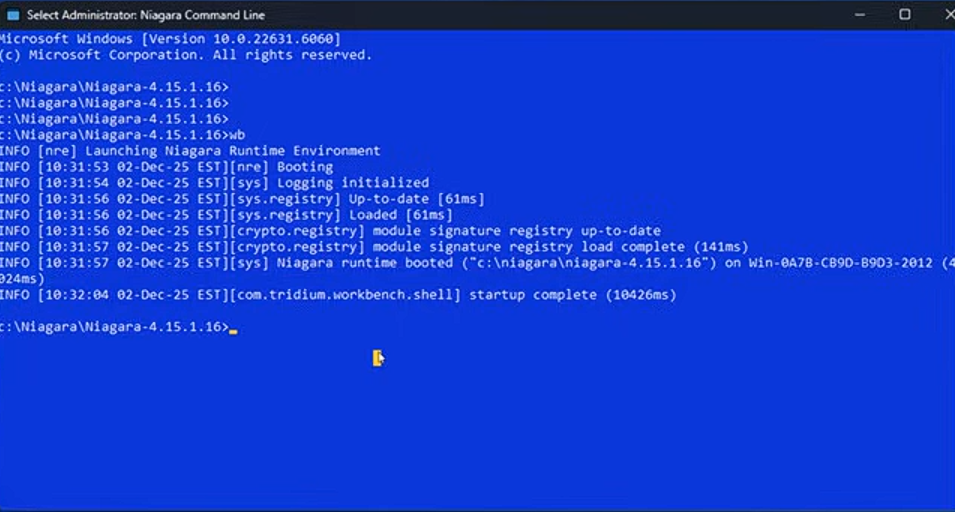
3. Launching Workbench from the Console
To start Workbench from the console:
wb
Benefits:
-
Displays live startup logs, including errors not shown in the GUI.
-
Useful when Workbench hangs or crashes before loading the UI.
Force-closing Workbench
If Workbench freezes or becomes unresponsive:
CTRL + C (twice)
This safely kills the process at runtime and is preferred over Task Manager when troubleshooting.
4. Retrieving the Host ID (Licensing)
When generating license requests, you may need the PC’s Niagara Host ID but Workbench may not display it.
Retrieve instantly with:
nre -hostid
The console will output the Host ID for the currently installed Niagara runtime.
This is the most accurate way to confirm Host ID when licensing issues occur.
5. Checking the Installed Niagara Version
To confirm the Niagara version, vendor distribution, Java version, and build details:
nre -version
Useful when verifying:
-
PC matches the version on a JACE
-
Version mismatches during commissioning
-
Platform daemon issues following upgrades
6. Installing the Niagara Daemon (Service)
If the Niagara Daemon fails to install through the GUI or you are rebuilding a workstation:
plat installdaemon
This:
-
Installs the Niagara Windows Service
-
Avoids the need to navigate via Start Menu
-
Is faster and more reliable during troubleshooting
Use this command after new installations or corrupted services.
7. Uninstalling the Niagara Daemon
If the daemon is corrupted, misconfigured, or you are switching between versions:
plat uninstalldaemon
This removes the Niagara service cleanly, allowing it to be reinstalled using the previous command.
8. Quick Reference Table
|
Task |
Console Command |
|---|---|
|
Launch Workbench |
|
|
Force-stop Workbench |
Ctrl + C (twice) |
|
Display Host ID |
|
|
Show Niagara version info |
|
|
Install Niagara Daemon |
|
|
Uninstall Niagara Daemon |
|
|
display a list of the largest files on a remote host details |
|
|
|
|
|
|
|
9. When to Use the Workbench Console
Use the console when:
-
Workbench crashes on startup
-
Host ID is needed but Workbench GUI will not open
-
You suspect a corrupt daemon/service
-
PC is running multiple Niagara versions
-
Diagnosing licensing mismatches
-
Running Workbench without using the mouse (faster for support engineers)
10. Forest Rock Support Notes
-
Commands shown are safe and directly interact with the installed Niagara environment.
-
Always ensure you open the Console for the correct version of Niagara (e.g., N4.10 console will not manage N4.12 daemon).
-
Avoid uninstalling the daemon on customer PCs unless absolutely necessary—document actions in the ticket.
Other Resources & Customer Survey:
💬 Don't miss out! Follow the Forest Rock News channel on WhatsApp Click Here!
💬 We’d also love your feedback! Please take a moment to complete our quick Customer Survey
It only takes a minute and helps us serve you better!

IoT Devices for BMS, Automation & Smart Connectivity | Forest Rock